When I posted on Facebook about these D-licious cookies that I make, the recipe was requested. I thought I'd share it here, because just about any sweet made with molasses and ginger falls into the Christmas category. So here it is:
Gingersnap Cookies
3/4 C Shortening
1 C brown sugar
1 egg
1/4 C molasses
2 1/4 C flour
2 tsp baking soda
1 tsp cinnamon
1 tsp ginger
1/2 tsp gr. cloves
1/4 tsp salt
granulated sugar for rolling
*Mix shortening, brown sugar, egg, and molasses.
*Stir in dry ingredients.
*Shape into 1-1 1/2 inch balls and roll in sugar.
*Bake on a lightly greased cookie sheet for about 8 minutes at 350'.
*Remove from cookie sheet immediately.
Usually these are perfect when they are just beginning to crack on the top. Don't overcook them! They are best when they are soft and chewy. Err on the side of underdone. We have a tradition in our family that we eat the first batch before the second one comes out of the oven. YUM!
Tuesday, December 13, 2011
Wednesday, November 2, 2011
Or Maybe Not...
As I continue to think about how I want to decorate for Christmas this year, I keep going back to the rustic look I did in our family room last year.

I used the old shed door as the rustic backdrop and kept to warm, cozy colors- the traditional red and green. I really enjoyed coming into the room and cuddling up by the Christmas tree. I think it's time to really think this all through and come up with a clear cut plan. I'm leaning toward doing something a bit lighter with cleaner lines upstairs, then the rustic look down in the family room again. That way we get the best of both worlds.
Today I want to share a beauty from Pottery Barn. I love this twig snowflake and it would be fabulous as part of the rustic/woodsy family room decor.

But I'm thinking...couldn't I make that? I think this would be a fun project to try with the kids.
Check back to see how we do.
Sunday, October 30, 2011
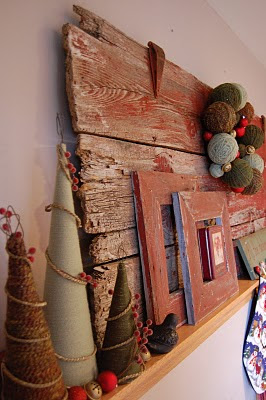
Yarn Wreath
Last year I shared a beautiful yarn wreath that I had seen at Recaptured Charm.

I did end up making my own version, but never shared it here. Well, today is the day to share. I really had a lot of fun making this and it is not at all difficult. Mine is smaller than the inspiration, mostly because I'm a cheapskate. The Styrofoam balls are pricier than you would think.

I also made yarn trees. Again, the foam cones are pricey. I cheated. I used posterboard rolled into cone shapes. Waaaaay cheaper.

I love the look of them displayed together.

I did end up making my own version, but never shared it here. Well, today is the day to share. I really had a lot of fun making this and it is not at all difficult. Mine is smaller than the inspiration, mostly because I'm a cheapskate. The Styrofoam balls are pricier than you would think.
I also made yarn trees. Again, the foam cones are pricey. I cheated. I used posterboard rolled into cone shapes. Waaaaay cheaper.
I love the look of them displayed together.
Spicy Pumpkin Chili

(Not my image. This is the picture from the Allrecipes website.)
Friday night we had a Trunk or Treat and chili cook off at our church. I decided to try a new recipe. It was one I found online and was itching to try. I cooked this up on Friday afternoon and I LOVED it. It is spicy and almost a little sweet. It is warm and earthy and delicious. So here's the link to the recipe: Spicy Pumpkin Chili
I did make a few changes, just because I wanted to use what I had on hand. I swapped out the Northern beans for corn. I like corn in my chili and I didn't have any Northern beans, so it worked out well. I used home canned tomatoes, homemade tomato sauce and a can of Rotel (tomatoes and green chilis.) I think the Rotel added a little extra spiciness which was nice.
This is a perfect recipe for a crisp fall day, or cold, snowy afternoon.
Enjoy!
(My chili arrived late and was not entered in the cook-off, so I can't tell you if it is a contest winner or not. I can tell you that the crock pot was scraped clean at the end of the dinner, so it was well-liked!)
Holiday Season 2011
Tomorrow is the last day of October and I have to say, I am soooo feeling the Christmas spirit already this year! Today is cold and rainy, and other parts of the country are experiencing their first real snowstorm of the season. As I sit here in my cozy home, looking out at the cold, drizzly day, I feel it's time to share my first post here in Christmasland.
Last year I decided that THIS Christmas I wanted to decorate with warm whites, grays, and silvers/mercury glass. But then I walked into Joann Fabrics the other day and saw a huge section of red and white decor. It all had a clean, Scandinavian look to it and my heart skipped a beat. I loved it all. I think the line is called Nordic Noel. At least, the online items I can find online are in that line.


So maybe I'll stick to my more traditional reds and whites. I spotlighted some cute products with Scandinavian flair back here. I'm thinking I should probably embrace what seems to appeal to me.
Wednesday, November 17, 2010
A Gorgeous Wreath

This may be my favorite Christmas project I've found in blogland this year, this yarn wreath from Recaptured Charm. So that means, if I craft nothing else, I need to do this, right?
Wednesday, October 27, 2010
Caramel Apples

Yes, it's another recipe. Saturday we purchased half a peck of apples at the farm market so I could try out this recipe I found at 101Cookbooks(dot)com. It was lots of fun to stand in the warm, fragrant steam stirring this caramel to thickening. It thickened up nicely, but by the next morning the caramel was puddled beneath the apples. It just slipped right off. I really didn't think it would happen when I saw how nicely it firmed up Saturday night. So I guess my recommendation is, eat them immediately.

Our only complaint was that the honey I used in the recipe has a funny taste to it. I bought the honey at a farmer's market this summer and none of us have cared much for the flavor. It's kind of a heavy, musky taste. I thought it might be OK cooked into caramel, but it's pretty strong. I'm anxious to try the recipe with a honey we like.

So here it is:
6-8 small apples, unwaxed
1 C heavy cream
1/2 tsp sea salt
1 C honey.
Line a baking sheet with parchment paper. Push a stick into each apple. Fill a large bowl 1/2 full with ice water and set aside.
In a medium thick-bottomed saucepan, heat the cream and salt until tiny bubbles start forming where the milk touches the pan- just before a simmer. Stir in the honey. Bring the mixture to a boil. Now reduce the heat to an active simmer and cook, stirring constantly for about 15-20 minutes or until the mixture reaches 255-260' F. To stop the caramel from cooking, very very carefully set the bottom of the saucepan in the bowl of ice water. Stir until the caramel starts to thicken up. (Thin enough to coat apples, thick enough not to run off.) If the caramel thickens too much, simply put the pot back on the burner for 10 seconds or so to heat it up a bit. Dip apples, place on parchment. Add sprinkles while still warm and sticky.
Saturday, September 25, 2010
Holiday Season 2010 (Pumpkin Cinnamon Rolls)

(Do I have your attention!?)
Well, I know it's time to get back to it over here at Gingerbread and Candy Canes when I have my first cup of hot cocoa. I had a cup of cocoa this morning alongside a delicious pumpkin cinnamon roll.

I thought this would be the perfect thing to share with you to kick off the season. This is something you can make now and then you can make it over and over throughout the holidays. When I saw the recipe a couple days ago at Good Life Eats, I knew I had to try it right away. I have TONS of pumpkin puree in my freezer from last year and now that it is pumpkin season again I figure I better start using it up before I have more to add to it.
These rolls are rich, gooey, and spicy.

Think cinnabon, but in pumpkin. SOoo good. I'm going to copy and paste the recipe here, but you should still go to the site and check out the pumpkin pie oatmeal recipe. I haven't tried it yet, but I fully intend to.
Pumpkin Cinnamon Rolls with Cream Cheese Icing
roll dough adapted from King Arthur Flour
makes approximately 15-16 rolls

Ingredients:
Roll Dough:
1/4 cup warm water (not hot, about 110 degrees)
1 package (2 1/4 teaspoons) active dry yeast
1/3 cup warm milk
1 large egg, beaten
3/4 cup pumpkin puree, either fresh or canned
1 tablespoon melted butter
2 cups (approximately) All-Purpose Flour
1 1 /4 cup Whole Wheat Flour
1/2 cup brown sugar
1 teaspoon salt
1/2 teaspoon cinnamon
1/4 teaspoon ground ginger
1/4 teaspoon ground cardamom
Filling:
1 stick butter
2/3 cup white sugar
1/4 cup brown sugar
2 teaspoons cinnamon
1/2 teaspoon each of allspice and ginger
1/4 teaspoon nutmeg
1/8 teaspoon cloves
Cream Cheese Frosting:
4 ounces cream cheese
1 stick (4 ounces) butter, softened
1 teaspoon vanilla extract
3/4 teaspoon lemon juice
2-3 cups powdered sugar
Directions:
In a large bowl, stir yeast into water to soften. Let rest for 5 minutes before stirring. Add milk, eggs, pumpkin, butter, 2 cups flour, brown sugar, salt, cinnamon, ginger and cardamom to yeast mixture. Beat vigorously for 2 minutes.
Gradually add remaining flour, a little at a time, until you have a dough stiff enough to knead. Turn dough out onto a floured surface. Knead, adding flour as necessary, until you have a smooth, elastic dough.
Put dough into an oiled bowl. Turn once to coat entire ball of dough with oil. Cover with a towel and let rise until doubled, about 1 hour.
Combine the white sugar, brown sugar, cinnamon, allspice, ginger, nutmeg and cloves in a small bowl, set aside. Transfer the risen dough to a lightly greased work surface, and pat or roll it into a 16" x 12" rectangle. Spread softened butter over dough and then sprinkle with the sugar mixture.
Roll the dough into a log the long way; it'll stretch to about 20" long as you roll. Using a very sharp knife, slice the log into 15 slices. In order to cut down on drag, it helps to rinse the blade in hot water, and wipe it off, between slices. Place slices in a greased 9x13 inch baking pan (or in two 8 or 9 inch round cake or pie pans). Cover with a towel and let rise until almost doubled, about 45 minutes.
Bake in a preheated 375°F oven. Bake the rolls till they're brown around the edges and beginning to turn golden brown across the center, about 20-30 minutes.
While rolls bake, prepare the cream cheese frosting. Add the cream cheese, butter, vanilla, and lemon juice to a small food processor. Blend until smooth and combined. Add the powdered sugar 1/2 cup at a time, blending in between, until well mixed and desired consistency is reached. (I used 2 cups powdered sugar)
Frost warm rolls with the cream cheese frosting and serve immediately.
For night before prep: Prepare the rolls up to the point where you roll and place in the pan. Then, cover in plastic wrap and refrigerate overnight. In the morning, remove the pan from the fridge and proceed with the instructions where you left off. Rising time may be slightly longer than noted in the recipe due to the dough being cold vs room temp.

Enjoy!
Wednesday, December 16, 2009
Peanut Butter Popcorn

This is a yummy, easy, recipe my Mom used to make sometimes. I make it pretty often. This is fantastic to throw together as a sweet gift, or to take along to a party. I threw some together just this morning when I remembered I was supposed to bring something to share to book club. So simple, and people always ask for the recipe. Luckily it's really easy to remember, so you'll be able to tell them on the spot.
Peanut Butter Popcorn
8 Cups popped popcorn, lightly salted.
1/2 C sugar
1/2 C light corn syrup
1/2 C peanut butter
1/2 teaspoon vanilla
Put the sugar and corn syrup in a saucepan on the stove. Bring to a boil. Remove from the heat, stir in peanut butter and vanilla. When thoroughly mixed, pour over popcorn. Stir to coat all the popcorn. Now, you can form it into popcorn balls, or leave it crumbly. I like to add in some chocolate chips because, hey! everything is better with chocolate chips. (Have you noticed that every single recipe modification I do involves chocolate chips?) You can add anything you think might be tasty- craisins, coconut, raisins, and another one of my favorites, pretzel sticks. It's also yummy to make the recipe with crunchy peanut butter so you have peanuts in it. Or add almonds or some other favorite nut. Have fun, be creative.
I'm linking up to the Recipe Party at Remodelaholic!

Tuesday, December 15, 2009
Trouble in Christmas City
I hope you enjoy this as much as I did.
Apparently there was some kind of emergency in our Christmas village yesterday. I came along and found this:
Bodies strewn around

Trees lying on their sides

The power out in the candy shop

And the swat team called in.


It's a Christmas tragedy.
Apparently there was some kind of emergency in our Christmas village yesterday. I came along and found this:
Bodies strewn around

Trees lying on their sides

The power out in the candy shop

And the swat team called in.


It's a Christmas tragedy.
Thursday, December 10, 2009
Well, They're Done
Remember these cute teacher gift ideas?

Remember how I said I was going to make them? Well, I did. The result:


I added the twine around one because it was the first one that I put together and it was a bit sloppy. I added the twine to cover up the globs of hot glue. You see, I decided they would hold up better if I covered them with glass, but the glass, of course, doesn't fit in the frame with the crayons. So I wrapped ribbon around the sharp edges of the glass, then hot glued the glass on TOP of the frame.
Do you like the twine? I didn't do the others with it, since I didn't have to, but should I?
Wednesday, December 9, 2009
Another Recipe I Haven't Tried...Yet.
First, a little follow up on the stuffing recipe. I didn't like it. It was too sweet for my liking. I think it was the brown bread. Turns out, I much prefer a more savory stuffing. But I did think it was pretty looking and if you like that sweeter sort of thing, I think it would be really good. So whatever, try it if you want.
I found this recipe today in blogland. I found it through Be Different Act Normal, but it's from Baking Bites. I don't know about you, but I think this is a guaranteed hit.
Triple Chocolate Cookies and Cream Peppermint Bark

Triple Chocolate Cookies n’ Cream Peppermint Bark
8-oz dark chocolate, chopped
8-oz milk chocolate, chopped
8-oz white chocolate, chopped
2 cups crushed peppermint Oreo-type cookies
or 1 cup crushed peppermint candies
Very lightly grease an 8×8-inch square baking pan with cooking spray.
In a medium-sized, microwave safe bowl, melt dark chocolate. Heat in 45 second intervals in the microwave, stirring frequently, until smooth. Pour into prepared pan and spread into an even layer with a spatula.
Refrigerate for about 20 minutes, or until firm.
Repeat with milk chocolate.
When milk chocolate is firm, repeat with white chocolate. Before refrigerating, sprinkle top with crushed peppermint Oreo cookies (Trader Joe’s Peppermint JoJos) or crushed peppermint candies.
Refrigerate until firm.
Bring to room temperature to serve. Slice with a sharp knife or break into chunks to serve.
Makes about 1.5-lbs of candy.
I'm very much looking forward to trying this one!
Monday, November 23, 2009
More Cute Stuff
Ok, a couple more things from Crate and Barrel. I love the Scandinavian look to these stockings. They have a very traditional look, while also carrying off a clean, crisp, modern edge. The very essence of Scandinavian design.


Purty Things
Today's line-up is plates I love from Crate and Barrel.
Imagine all the fun combinations of layering you could do with these beauties. I must confess that I enjoy all the fun color combos and trendy color schemes in holiday decorating right now, but when it comes right down to what I like to have in my home for holiday decor, it usually comes back to red, white, and green. What can I say? I'm a traditionalist!


Imagine all the fun combinations of layering you could do with these beauties. I must confess that I enjoy all the fun color combos and trendy color schemes in holiday decorating right now, but when it comes right down to what I like to have in my home for holiday decor, it usually comes back to red, white, and green. What can I say? I'm a traditionalist!


It's Beginning to Look A Lot Like Christmas

Well, the outdoor lights are up. I didn't do the idea I posted about because I felt like I needed to get the lights with the bigger bulbs and I was feeling too cheap. Maybe I'll change my mind later on. It was a long process, what with the temperamental lights being fickle about whether to all light or leave sections of icicles in darkness. One last challenge is to figure out how to get the tree on the porch plugged in. I guess I need to go get one of those converters that will give me multiple outlets. (Update: I did get a converter outlet, the tree is lit. Now what to do about the one foot section of icicle lights that refuse to light?) I LOVE to see the house all decked out in holiday lights. It is worth every minute of each of the six hours spent fighting with lights and running around town collecting items I needed but hadn't planned for. I love the look of the white lights, though I'm just now coming around to accepting the icicle lights and not hating them for their faddiness, or fad-y-ness or something. But I've got to say that I sure get a warm feeling inside when I see multi-colored lights, too. Our neighbors across the hill have colored lights up and it really struck me this year (after I had already spent 6 hours putting up white icicle lights), how much I really love them for the sentimental value. I'm looking forward to putting up the tree in our family room, bedecked with colored lights and a mish-mash of ornaments from my childhood, our early married years, right on through to the kids school projects. In all my efforts to create a "magazine layout" look for my Christmas decor, I've come to realize that all I really care about and truly love, is a look that doesn't make it to the pages of decorating magazines. It is created over time, built with memories and traditions. How it looks is not the measure of its beauty, but how it feels. Seeing the popsicle-stick sled ornament I made in the fourth grade makes me feel happy, nostalgic, though it's not much to look at. The tinsel ball has all the stylish appeal of yard flamingos, but the memory of each of my siblings and myself each throwing one of the tinsel balls onto the tree at the very end of decorating it each year, brings a smile and contentment knowing that we all have our tinsel ball on our own tree now, a little something that connects us together though distance separates us. Each year I have a little laugh and thank once again the well-meaning teacher who thought my child needed to make an ornament out of a 4x6 picture of herself and a popsicle-stick frame. I don't forget to send up a laugh and a thank you to the primary teacher who thought the letter-size envelope mangers were a good idea, either. We have ornaments that were wedding gifts and some that were gifts from dear ones no longer with us. We have an array of ornaments we've made together as a family as a family night activity and ornaments that have been selected one at a time from a special time or a special place. None of these ornaments have a common color scheme or obvious theme, but what binds them together and makes a beautiful tree is love. And isn't that what the season is all about? God's all-encompassing love and the trickle-down effect: Our love for our fellow men, the reflection of God's love for us.
Friday, November 20, 2009
Brown Bread Squash Stuffing
I'm not a big lover of stuffing. Soggy bread, onions, and celery cooked together totally grossed me out as a kid and it has taken me a long time to get past that. You know that instant stove top stuff? That's my speed- with nothing added to it. But as I've grown up and matured, I've been coming around. A few years ago I copied down this recipe for Brown Bread Squash Stuffing, (I don't remember the source), because I thought it sounded like a nice variation on traditional stuffing. Plus, Brown bread is so quirky and reminds me of my childhood. Most people of my generation don't even know what brown bread is. (When I asked at a certain superstore if they carried canned brown bread the lady started heading toward the bread isle and said, "I'm assuming "Canned" is the brand name?") In fact, brown bread is bread in a can. Mom used to put it in our 72 hour emergency kits. She would rotate it out when it was time for it to be used and we would slide it out of the can, slice it up, and toast it for breakfast.
So when I saw a recipe that called for brown bread, I thought, "I haven't seen that stuff in years! I have to try this recipe!" As it turns out, brown bread can be a little difficult to find. I have yet to make this. BUT, it is on the Thanksgiving menu this year. I found brown bread at the local Piggly Wiggly and I have already cut it into cubes along with the honey wheat bread to be toasted and made into stuffing in a few days. Anybody want to try it with me? I can't recommend the recipe yet because I haven't tried it, but I think it sounds good. If you want to give it a try, here is the recipe. Let me know if you make it and how it turns out.
Brown Bread Squash Stuffing
7 C honey wheat bread cut into 1/2" cubes (7-9 slices)
(1) 16 0z can brown bread with raisins, 1/2" cubes (5 C) (Look for brown bread in the grocery store next to the baked beans)
6 T butter
4C peeled and seeded squash 3/4" cubes (butternut or acorn)
1 1/2 C coarsely chopped celery with tops
1 large red onion, thin wedges
2 1/4-2 3/4 C chicken broth
1/4 C snipped fresh sage {OR} 2 tsp dried sage, crushed
2 T fresh parsley
1 tsp ground nutmeg
1/2 tsp salt
1/2 tsp black pepper
*Preheat oven to 325 degrees. Spread wheat bread and brown bread cubes in 2 shallow baking pans. Melt 4 T of butter and drizzle evenly over bread cubes. Toss to coat. Bake, uncovered, 15-20 minutes, until lightly toasted, stirring once. Transfer to a very large mixing bowl.
*In a very large skillet, melt 2 T butter over medium heat. Add squash. Cook, uncovered, 5 minutes, stirring occasionally. Add celery and onion; cover and cook 10 minutes more. Stir in 1/4 C broth. Cover and cook 5 minutes more, until squash is just tender. Stir occasionally. Remove from heat. Stir in sage, parsley, nutmeg, salt, pepper.
*Add squash mixture to bread in bowl. Add 2 C of broth; toss to coat. Add enough broth for desired moistness.
*Transfer stuffing mixture to a greased 3 quart casserole dish. Bake, covered, for 30 minutes. Uncover and bake 15 to 20 minutes more, until heated through.
~TIP: Bread crumbs can be toasted and kept dry in an airtight container for up to 2 days.
Prep: 35 min
Bake:45
Yield: 10-12 serv.
Thursday, November 19, 2009
Outdoor Lighting...Any Ideas?
What do you think of this look, courtesy of Better Homes and Gardens?

I'd like to do something a little different with my outdoor lighting this year. Not that I do much anyway, but I thought a little twist on the traditional might be nice. I really like the look and it sounds really easy. I wish I had a beautiful fence to put it on, but I'm picturing it on my front porch railing, and maybe even my deck railing too. Of course, it also makes me want to splurge for real greenery, but I'll refrain and use my fake stuff!

I'd like to do something a little different with my outdoor lighting this year. Not that I do much anyway, but I thought a little twist on the traditional might be nice. I really like the look and it sounds really easy. I wish I had a beautiful fence to put it on, but I'm picturing it on my front porch railing, and maybe even my deck railing too. Of course, it also makes me want to splurge for real greenery, but I'll refrain and use my fake stuff!
Wednesday, November 18, 2009
Searching for the Christmas Spirit

(Spirit of Christmas by Thomas Kinkade buy it here.)
Oddly enough, this year I'm really working to get in the mood for Christmas. It's not that I'm NOT looking forward to Christmas or that I'm grumpy or depressed, it just hasn't overcome me yet. Which is OK, it's not even Thanksgiving yet, but each year I feel like the Christmas season is shorter and shorter and I want to start celebrating a little earlier. So I guess I feel like not being overcome by eager anticipation yet is wasting my time!
I have a theory about the lack of Christmas Spirit. I think it has something to do with the messed up weather this fall. It has thrown off my groove. We got summer in September, colder than normal weather in October, cheating me out of October's bright blue weather, then a warm November but of course with the leaves gone by and no brilliant blue sky. The natural progression of my favorite time of year has been completely obliterated and I just don't know how to settle into this craziness!
But never fear! I am feeling the first twinges. Last week I cut open a grapefruit and the tangy-sweet aroma wrapped me in Christmas. I also bought a bag of Cuties, those easy to peel seedless little tangelos or tangerines or oranges or whatever they are, and each day I've had one or two with the same effect. I think I have mentioned on here that my parents always bought a bushel of oranges and a bushel of grapefruit around this time of year. Oranges and Christmas go hand in hand for me. We would sit by the tree eating oranges, citrus and evergreen mingling in delicious holiday perfection.
I am also getting excited about some Christmas present projects that are cooking in my mind and beginning to develop into reality. I wish I could talk about them on here, but a certain daughter of mine reads this blog and I don't want her to know what everyone is getting. (Hi Kennedy! Love you!)
What puts you in the Christmas Spirit? Decorating? Projects? Food? Music?
Tuesday, November 10, 2009
Christmas Cozy
I desperately want my bedroom to look like this for the holiday season:

I love this so very much. I've always wanted to have holiday bed linens, but I'm just so cheap. I don't even like to spend the money on everyday bed linens, say nothing of linens I would use only 2 months out of the year. But, BUT, take away the snowflake pillow and throw, and I COULD use this at other times. Hmmmmm....
Buy it here, from Plow and Hearth.
Monday, November 2, 2009
Cranberry Squares

I happen to love cranberries. I love the look of them, I love the taste of them, I even love the smell of them. (Have you tried the cranberries and frost Febreze? I love it!) As a result of this love affair, I have lots of delicious recipes featuring these beautiful, tart, berries.
Today's recipe is one I've had for a while. I think I may have gotten it from Better Homes and Gardens, but I'm not positive. And it's actually 2 recipes, because you need a batch of one recipe to put in the other.
So first up is
Brandied Cranberry Sauce Yield: 3 cups
4 C fresh or frozen cranberries
2 C sugar
1/3 C orange juice
Place 4 cups of fresh or frozen cranberries in a 9x13 baking dish. Sprinkle evenly with 2 cups of sugar. Cover and bake at 300 degrees for 1 hour. Remove from oven. Stir carefully, then stir in orange juice. Pour into jars or serving dishes. Store in fridge.
You can serve this as a Thanksgiving or Christmas side or garnish, or use it to make
Cranberry Squares
1 1/2 C each of Oats, flour, brown sugar
1 teaspoon baking powder
Mix the above ingredients together, then blend in
1 C butter
until mixture is crumbly.
Press 2/3 of mixture into the bottom of a 9 inch square pan. Top with 1 C. of Brandied Cranberry Sauce. Sprinkle remaining oat mixture over cranberries.
Bake at 350 degrees for 30 minutes. Cool completely.
Now, I've tweaked that basic recipe a bit for my own tastes, and you can do the same. For example, I always add some cinnamon to the oat mixture, probably a teaspoon. You can add coconut (I am guessing coconut lovers would like that. I can't stand the stuff, so I'm not a good judge of this!), walnuts or other nuts, and the one I always add, chocolate chips. These are great to whip up for a holiday party. If you make a batch of Brandied Cranberry Sauce to have on hand all season, these whip up pretty quickly.
I don't have a picture right now, but maybe I can add one later in the season. I know I'll be making these!
Monday, October 26, 2009
Pumpkin Cookies
Wow, has October been a busy month! Before it even really began, my better half and I left for NC for a long weekend visiting family and friends and enjoying a U2 concert. We got home, recovered for a few days, then turned around and took off for northern Wisconsin and our first running races. This time we returned home, spent a couple days with Mom and Dad, then bid them farewell, and Lincoln left for northern Wisconsin once again to go on his annual fishing excursion with some friends. This past weekend we enjoyed some family time and now it's the week of Halloween and I have school parties to prepare for, as well as the party we're throwing here at our place, not to mention actual Halloween and all that entails. So I haven't been thinking about Christmas much. However, I did recently make our favorite pumpkin cookies and I thought I'd share the recipe with you. I figure pumpkin kind of fits the bill from early fall, right on through to Christmas.
Soft Pumpkin Chocolate Chip Cookies
(Let me say right away that this recipe actually calls for raisins, but I like chocolate chips in everything and can't stand raisins in cookies. I would like to try craisins sometime, though. You could put in nuts, if you like them too. Anyway, so far I've just stuck with chocolate chips.)
1/2 C butter (room temp)
1 1/2 C brown sugar
2 large eggs
1 C canned pumpkin
1 teaspoon vanilla extract (I was out of vanilla last time so I added pure maple syrup- it was very good)
2 1/2 C flour
1 Tablespoon baking powder
1 1/2 C chocolate chips
2 teaspoons pumpkin pie spice
Preheat oven to 375 degrees. In a large mixing bowl, beat butter and sugar together until light and fluffy. Beat in eggs one at a time. Stir in pumpkin and vanilla. In a separate bowl, combine flour, baking powder, spices. Stir to blend. Add dry ingredients to butter and sugar mixture, stir well. Stir in chocolate chips. Drop one inch apart onto greased baking sheets.
 Bake in upper half of oven for 12-14 minutes. Cool on racks.
Yield: 3 dozen cookies
These were eaten up almost instantly by the house full of kids that was here on Friday and I never got a picture of them cooked. You'll have to bake them yourself to see the finished product! Enjoy!
Soft Pumpkin Chocolate Chip Cookies
(Let me say right away that this recipe actually calls for raisins, but I like chocolate chips in everything and can't stand raisins in cookies. I would like to try craisins sometime, though. You could put in nuts, if you like them too. Anyway, so far I've just stuck with chocolate chips.)
1/2 C butter (room temp)
1 1/2 C brown sugar
2 large eggs
1 C canned pumpkin
1 teaspoon vanilla extract (I was out of vanilla last time so I added pure maple syrup- it was very good)
2 1/2 C flour
1 Tablespoon baking powder
1 1/2 C chocolate chips
2 teaspoons pumpkin pie spice
Preheat oven to 375 degrees. In a large mixing bowl, beat butter and sugar together until light and fluffy. Beat in eggs one at a time. Stir in pumpkin and vanilla. In a separate bowl, combine flour, baking powder, spices. Stir to blend. Add dry ingredients to butter and sugar mixture, stir well. Stir in chocolate chips.
 Drop one inch apart onto greased baking sheets.
 Bake in upper half of oven for 12-14 minutes. Cool on racks.
 Yield: 3 dozen cookies
These were eaten up almost instantly by the house full of kids that was here on Friday and I never got a picture of them cooked. You'll have to bake them yourself to see the finished product! Enjoy!
Wednesday, October 14, 2009
Teacher Gifts
I know that it is perhaps a bit early to start thinking about teacher gifts. But is it really? If you want to do something hand made it seems wise to start planning now. Plus, I wanted to share this before I forgot where I had seen it. I found these ideas on one of my favorite blogs, Be Different Act Normal. She found them somewhere else and links to the original post in hers. I'm not sure if those links work anymore, though. It's been a year and I know one of them didn't. I thought both ideas were very cute and very easy.

There is a link there for ordering vinyl letters but I'm going to add one of my own. I've ordered vinyl from Shelley several times and have always been very pleased. She even packages it up cute. So go check out Wonderfully Wordy and see what you can find.
And what Mom of young kids doesn't have an unending supply of crayons? You can get cheap frames at Goodwill and paint them, or just pick up some of the $2 frames at Walmart. I think these are adorable and I have every intention of making them for our teachers this year.

Tuesday, October 6, 2009
Fun Christmas Games
So I just found this website chock full of fun Christmas Games and activities. You've probably seen those games where you have to figure out what Christmas song is represented by the picture riddle? You can print that here. It's a good source for quick games for Christmas parties and church activities. She calls herself Santa Lady. Go ahead, take a look, see what catches your fancy.
Monday, September 21, 2009
Another Holiday Season Is Upon Us!
I'm ready to get blogging again! I had thought I would copy a post from my family blog here to kick things off. Last winter I wrote about getting the Christmas Tree and I thought it would be fun to share it here. However, I am not computer savvy enough to just transfer the post from that blog to this one. Anyone know how to help? In the meantime, (see below! Thanks Jenn-Lee!) here's the link to the Christmas Tree post. Enjoy!
That's right. Today was the big day. Devon has asked me several times a day every day for the past week, "How many tomorrows 'til we get our Christmas tree?" Well, his wait is finally over.
We slept in this morning, then I cooked a tummy warming, thigh expanding breakfast of pancakes and bacon. We filled our tummys and then spent the next hour bundling up and loosening carseat straps so we could warmly and safely transport our crew to the tree farm.
I know there are some haters out there, (I'm looking at you, Stephanie), but it was so invigorating and well, RIGHT, to be out in the snow tramping around searching for The Perfect Tree. The first year we lived in NC, I went to the nearest corner tree lot to get a tree. It was nearly 70 degrees. I put on a sweater to get in the spirit, but I didn't need one for warmth. I remember thinking, 'This just isn't right." You see, I grew up in the north. Getting a Christmas tree was an all day snow adventure. We would bundle up in our warmest winter gear, Ski-doo suits, (snowsuits to the non-local), snowmobile boots, (this was a very specific kind of boot with a wool pull-out liner bootie, rubber shoe, nylon-zippered upper, a lace at the top to tighten it all up and keep out the snow. I think we had a pile of these and each winter each child would go through the pile and lay claim to the pair that fit them. We did the same thing with ice skates), wool mittens, crocheted scarves, toques (I think that's how you spell it, help me out north country folks and Canadians), and Mom's Army issue wool snow pants and parka. No, she was not in the Army. Where did you get them, Mom? We would load up sleds, skis, baling twine, six kids, and Mom and Dad in the station wagon and head up to The Old Place. "The Old Place" was ten minutes up the road to a dirt road leading back into the woods. Here was where my father had lived as a child. Throughout my youth and sometimes still, my Dad referred to it lovingly as The Old Place. When we arrived at the dirt road we would stop, unload, and hook tow-ropes up to the trailer-hitch and bumper. To the other end we would attach sleds for the little kids and the bigger kids would take turns skiing behind the car. The road was usually plowed a bit, but never really scraped and certainly not salted or sanded. It was perfect for our entertainment. How fondly I recall the exhaust in my lungs and the snow in my face. We would whiz along, stopping only when someone went tumbling out of a sled or biffed it on the skis. Oh yes, and to take a few runs down the big hill on the sleds. When we arrived at the grove of evergreens we would all tramp out into the snowy woods searching for The Perfect Tree. Of course, this was no tree farm, it was just The Woods. So there was no such thing as The Perfect Tree. We just wandered around and around, knocking billows of snow off branches hoping to find The Perfectest Tree Possible. As far as I can remember, this always meant topping a tree because they had all grown far beyond living room size. So we would gaze up at the tops of the trees until my Mother and Bryan (my oldest brother) were satisfied we had found The Best Possible Tree Top. Then Dad or Bryan would climb up and cut it down. You know, when you're looking up at a pine tree, it looks pretty full and well-rounded. Funny they never seemed to look that way in our living room. We would drag the tree out to the car, strap it on, and then sled and ski our way back out to the main road. After allowing the tree to dry on the porch for a couple days, we would empty the bathroom garbage can, an orange and white vertically striped heavy duty plastic number, and place our tree in it. We used it as a tree bucket for as long as I can remember. Then we would get out the fishing line and Dad would string it up in the corner. This was a touchy business, the tree tipping from side to side and never really truly secure. After the stringing up, it was Mom's responsibility to untangle and check all the lights. I remember how irritated my Mom would get with this. They would never just all light up on the first try. She would get them all untangled and then try each bulb to find the one that was out. On each strand. With six kids running around dying to get to the decorating part. oh, my mother is a saint. I pretty much just have to light them up and wrap them around my tree and I STILL am ready to lose it by the time I'm done. But eventually she would prevail and the big C9 lights would be wrapped beautifully around the tree and then we would decorate. We always had that very 1970s tinsel garland. And as if that wasn't enough, we also had the string tinsel you lay on the branches. We had tinsel balls, too. One for each of us kids. We would throw them on at the end, altogether.
My mother loved the Christmas tree. She stills does. We didn't have a TV when I was kid. We would watch the tree. My Mom would lie under the tree with us, looking up through the boughs. She would peel oranges for us and we would sit by the tree and eat oranges. Still the mingled scent of oranges and evergreen transports me back to our family room Christmas tree. And always, ALWAYS, in the background Christmas music would be playing on our old record player. The Christmas tree was magic. Pure Christmas magic. I loved to watch the ornaments catch the light. I loved to bring my Barbie Dolls down and imagine wonderful stories for them in the glow of the tree. My mother showed us the magic and the peace of being still and feeling Christmas. What a precious gift.
But now, look at this. The time is far spent and I haven't even told you what I set out to tell- the story of THIS year's tree. I'll let the pictures do the telling, I guess.


Subscribe to:
Posts (Atom)


